Showing posts with label tutorial. Show all posts

Sunday, 1 December 2013

christmas craft tutorials

There are some wonderful tutorials on blogs lately so I thought I'd share with you some of my favourite Christmassy tutorials and printables.


I love bottle brush trees and I have a few of the little beauties in my possession now. I have never tried to make my own yet though and Cathe at Just Something I Made recently posted a tutorial on how to make your own - who knew you could do that?!


Something else I've been obsessing over for the last few years are Putz houses. These glittery cardboard houses look so sweet. I made a church and a few houses last year but unfortunately I didn't store them correctly and they got all squished in the loft.


I'm definitely going to make them again and these templates from Little Glitter Houses make the job a lot easier.


There are some beautiful free printables out there in blogland. These woodland chalkboard style gift tags from Lia Griffith are great. The fonts that Lia has used are so sweet.


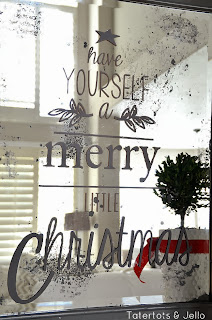
I often drool over the tutorials on Tatertots and Jello, the things that Jen can make are awesome. She recently took part in a series called Knocktoberfest and this Pottery Barn mirror knock off is definitely on my long, long list of things to make. I'll need to do some research on some of the items used to distress the mirror. I have never heard of muriatic acid before! Unfortunately I don't yet have a Silhouette Cameo so I'd have to cut the vinyl by hand but I guess that would add to the handmade charm.

I hope you enjoyed my little round up of fab tutorials!

Tuesday, 14 February 2012

easy valentine's tutorial


Here is an easy Valentine's Day tutorial to do with the kids. You don't need much in the way of supplies or equipment and it is quick to do. In only a few steps you will have this garland to hang on a shelf for Valentine's Day.


You will need pink and red card, heart template, pencil, scissors, hole punch and string or twine.


Lightly draw around the heart template with pencil onto the card.


Cut out your heart. I used deckle edged scissors to get a wavy line but you can use normal ones if you prefer.


Hole punch a hole on either side.  You could take more time than us and get the holes to line up of course. My 7 year old did the punching on this one.


Cut out 2 pink hearts and 2 of the red.


You are nearly finished, just need to decide what to thread the hearts on to. You could use thin ribbon, twine or string. I have used bakers twine in a beautiful aqua colour. I love bakers twine and it comes in loads of colours. It doesn't fray, so that is definitely a bonus! You can buy it from all sorts of places now, I bought mine from Etsy.


Your garland is now finished, all ready to hang!


I told you it was easy, and quick enough project for the kids to do without getting bored.  You could make it more detailed by embellishing each heart or writing 'L O V E' on each one. I left ours just plain.


Let me know if you make a heart garland, I'd love to see your creations.

Happy Valentine's Day!
xoxo


Related Posts Plugin for WordPress, Blogger...